XCOM 2 is an awesome game, but sometimes things can bug out, or gameplay can get boring. The console is a great way to fix these problems, regardless of whether you need to literally fix something, or if you want to spice up gameplay, or skip past a certain mission or point in the game.
This guide will take you through the basics of the console in XCOM 2. Use the links below to jump to a particular point in the guide:
How to Enable the XCOM 2 Console
The console is enabled via the -allowconsole launch option. The way launch options are added depends on whether you're playing the game through Steam or not.
Steam
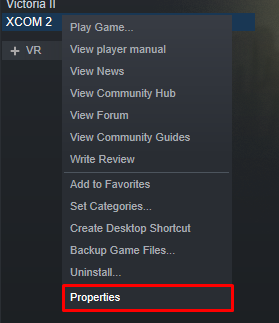
If you're playing XCOM 2 on Steam, the process to enable the console is relatively simple. First, open up Steam and go to your "Library" (top left, next to "Store"). Then, right click XCOM 2 and select "Properties", as illustrated below:

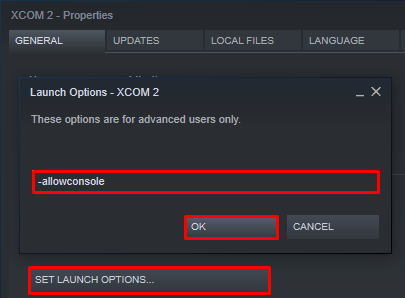
After opening up the Properties Window, click "Set Launch Options...", and enter the following into the box:
After typing that into the launch options box, hit OK. Below is an image of what the launch options box should look like:

After adding the launch option, the console is enabled. See How to Use the XCOM 2 Console below for help opening and using it after loading up the game.
You can optionally add -log (for a log window to open with the game) or -autodebug (to enable debug options for the game as well).
Non-Steam Versions
Enabling the XCOM 2 console on non-Steam versions of the game is just as easy as doing it through Steam. First, you'll want to navigate to the location you installed the game to, which is probably at C:\Program Files\XCOM 2 or C:\Program Files (x86)\XCOM 2, then head to the following folder:
Binaries\Win64\Launcher
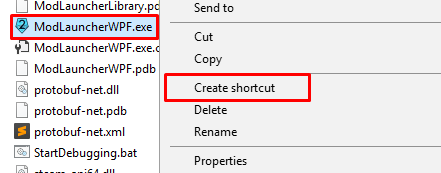
When in that folder, right click ModLauncherWPF.exe (it may display as just "ModLauncherWPF") and create a shortcut, see the below picture for help:

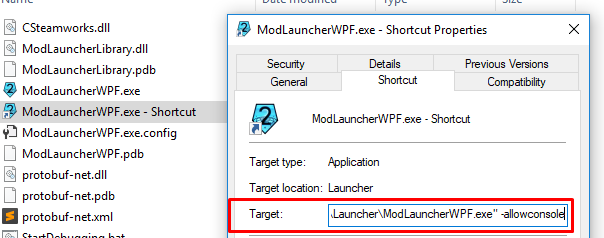
After creating the shortcut, right click the shortcut (not the original file) and click "Properties". In the properties menu add -allowconsole to the end of the target text box (with a space before), as is displayed in the below image:

After doing that, hit "Apply", and close out of the properties window. Then launching XCOM 2 from the newly created shortcut will launch the game with the console enabled.
If you have a shortcut on your desktop, or another location, you can instead add the launch option in the target field to that shortcut, and then the game will have the console enabled when you open it from that shortcut.
How to Use the XCOM 2 Console
The console in XCOM 2 can be opened by pressing one of the following keys on your keyboard (depends on keyboard layout):
- ~ (tilde)
- ' (single quote, works on UK keyboards)
- \ (backslash, opens small console in bottom of screen)
You can close the console by pressing ESC, or the same key you opened it with.
Using the console is pretty simple, simply type a console command into the console and hit ENTER to send it.
Sometimes commands require arguments, these are extra words or numbers you add to a command to tell it what to do. All arguments are separated by spaces. An example of a command with an argument is the giveactionpoints [amount] command. In this command [amount] is an argument - it tells the command how many action points to add. If you were to replace [amount] with 5, the command would be giveactionpoints 5 - this would add 5 action points.
If you're looking for commands to use with the console, check out our comprehensive list of all commands in the game by clicking the button below:
That's all there is to enabling and using the console in XCOM 2. If you have any questions, feel free to reach out to us on Twitter @ConsoleCMDs.

